Monday, April 22, 2019

Developing Solution for Microsoft Azure - Exam AZ-203


Here is the topic list to focus on the exam AZ-203 Developing Solution for Microsoft Azure.
I am preparing the notes, learning and study points by searching the each sub topic in the Google and prefer the first 3 link including the Microsoft Documents on Azure on  search result page.

Apart from these, I have also free Azure subscription and Pay as you go subscription to test the exam oriented topics.

And also I have collected many eBooks on the internet, here is the links for you to download


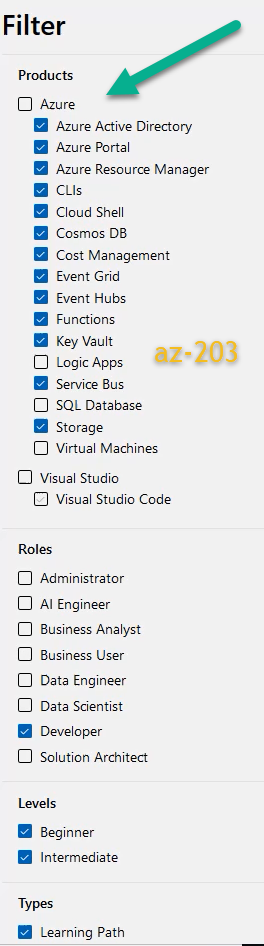
There is also Microsoft Learning portal , that is specifically allow you to select your Azure Role and display the related course content. If you are preparing for the AZ-203 exam, surely this will be useful for.
All you need is select the appropriate course for AZ-203 exam, Here I have selected with required filter and got the  result.

Microsoft Azure Learning Path for exam AZ-203


Gradually I will update the each subject and sub topic with relevant link.

1. Developing Azure Infrastructure as a Service Compute Solutions (10-15%)
  • The sub-categories of this module includes
  • Creating containerized solutions
  • Implementing batch jobs by using Azure Batch Services
  • Implementing solutions that use virtual machines
2. Develop Azure Platform as a Service Compute Solutions (20-25%)
  • Creating Azure app service web apps
  • Creating Azure app service API apps
  • Creating Azure app service mobile apps
  • Implementing Azure functions

3. Developing for Azure storage (15-20%)
  • Developing solutions that use blob storage
  • Developing solutions that use a relational database
  • Developing solutions that use Cosmos DB storage
  • Develop solutions that use storage tables
4. Implementing Azure security (10-15%)
  • Implementing Access Control
  • Implementing Authentication
  • Implementing Secure Data Solutions
5. Monitoring, troubleshooting, and optimizing Azure solutions (15-20%)

6. Connect to and expend Azure Services and Third-party Services (20-25%)
  • Establishing API Gateways
  • Integrating Azure search within solutions
  • Developing an app service logic app

Monday, April 08, 2019

Simple Understanding on JavaScript namespace

To understand the concept of namespace in JavaScript, you might have gone through lengthy article which trying to correlate other aspect of JavaScript and OOPS concept to make or convince you to understand the Namespace in JavaScript topic.

Here I've corroborated few points on my own to understood this concept from various sources.


  1. This approach will useful for reusable and maintainable code base and also easy to roll out the new updates to it.
  2. Another valid point is it can be extensible without modifying the original JS file.
  3. Namespace approach has been widely used in almost all JS framework and libraries.
  4. It removes the variable name, class and function name pollution in the Web Page or Apps.
    Example:
If you have 3 functions in the page, called MapView(), but same time, you are using the third party library and not sure the variable names in the library, If you used the same name function or variable in your page, then it will be conflict.

To overcome this problem, just isolate the function name or variable name using the namespace.

You can declare the namespace in Javascript like this.its best idea to write the below code in separate JS.

var ns = {};
ns.login = function()
{
alert("You are logged in");
}
ns.logout=function()
{
alert("Logged out");
}


You can call this namespace in your html,


Namespace in JS - Simple understanding


Thursday, March 28, 2019

Creating Azure Web app through Azure CLI


Main topic : Develop Azure Platform as Service Compute Solutions

Subtopic :
Create Azure App Service  - Web app

Azure CLI is command line platform to manage the Azure resources , the command syntax are very relevant for non Microsoft technologies developer those are familiar with Node.js , bash ,ssh command and python shell programmings. Its often very useful for scripting and automation purpose.

For managing the Azure resources quickly you can also install it on your windows machine and connect to Azure account as PowerShell Command. The main advantage of the Azure CLI is , its very interactive. At any point you can type the Az -h or you can also install the az interactive (extension) on your command prompt [ Screen attached]

You can download the Azure CLI for Windows, macOS and Linux  from this link.
https://docs.microsoft.com/en-us/cli/azure/install-azure-cli-windows?view=azure-cli-latest

 Once you installed it , you are ready connect and manage your resource.Go to your prompt

> type az account

It will open the browser and prompt you to login into your Azure account. Once its successful , you will see the output in JSON format which contains the subscription details.
Before we create the web app in Azure app, the resource group is the main hierarchy , here is the syntax for creating the resource group

To Create the Resource Group, type the following comment

>type az group create --name "resourcegroupname" --location "Central India"

T delete the group

>> type az group delete --name "resourcegroupname"

It will take few minute with loading comment "Running...."

Now we create tne App Service Plane

C:\>az appservice plan create --name "murugesanreg" --resource-group "murugesanreg" --sku free --location "central india"

So I have resource group and app service name. Now I can create the web app.

C:\> az webapp create --name "murugesanwebapp2" -g "murugesanreg" --plan "murugesanreg"

Tuesday, March 26, 2019

Creating Azure Web App using PowerShell and Visual Studio


In last sections, We have learned how to create the App Service, Hosting plans and created the web app through Azure Portal.

In this section, we are going to learning the various methods on creating the web app.

  1. Azure PowerShell
  2. Azure SDK.NET (Visual Studio )
  3. Azure CLI (Command line interface) and
  4. Azure Resource Management Template(ARM)

In all above methods these are the mandatory parameters
  1. ResourceGroupName
  2. Location
  3. Name and
  4. AppServicePlan

I ) Creating the Azure Web App - Azure PowerShell

Azure PowerShell Command for creating the new web app

Before using the below command ensure, that Azure Module has been installed on your machine.

You must have PowerShell Version 5.1 or higher to install the Azure Module and connect to Azure Services. Confirm the PowerShell version, by typing the below command in PowerShell Window

$PSVersionTable.PSVersion

If it is greater that 5.1

and now install the Azure Module, use the below command, please ensure that you are running the PowerShell command window as Administrator.

Install-Module -Name Az -AllowClobber

You need to trust this repository, to install all the modules, so select Y or A
Now you will see the Installation progress as shown in the attached images
Now run this command to create the Web App, First you need to login to your Azure account


Installing the Azure Module in Power Shell


PS C:\> Connect-AzAccount


This will open the browser window and prompt you to log into your Azure account.
Once its connected, You can see your subscription details in the command window.

PS C:\>New-AzWebApp -ResourceGroupName Default-Web-WestUS -Name "yourwebsite" -Location "West US" -AppServicePlan "AppServicePlanName"


II ) Creating the Azure Web App Service and Web App

Creating through the Visual Studio, ensure you have installed the Azure SDK.NET on your machine before connection to Azure and Publish your website to it.


For my personal experience, I have just selected the ASP.NET core application 2.0 and it push nearly 45.8 MB files including all Azure related assemblies in to it.

And it takes at least 3 minutes to publish the simple default template website.

Its better not to use the Visual Studio to create the WebApp.